Introduction
When we talk about Android development, one of the most common questions is: “How am I going to build my screen navigation?” or “Which tool should I use to support my screen transitions?”
Not only is navigating between various screens crucial to the user experience in Android, but it is also something that can impact our code base as it has to be maintainable throughout the project. Every time we need to add a new feature, we might need to add a new screen and change the navigation.
At Pocketworks, our experience with Jetpack Compose began recently. This past year has been a learning journey for our Android team. We've been incorporating Compose into our new features and migrating existing ones whenever possible to keep our team and the projects up to date with the latest Android guidelines.
For those unfamiliar with Jetpack Compose, it is a modern and powerful UI toolkit designed to simplify UI development in Android, so what's special about it? It combines a reactive programming model with the conciseness and ease of the Kotlin programming language, leveraging the language's full potential.
Since we've adopted this new approach to developing our layouts, we've noticed that we're writing significantly less code and reusing components more than ever before.
So what does this have to do with Navigation?
After building several features with Compose and migrating some of our old XML code, we have reached to a point where some of our Fragments are only working as Composable containers, so these can communicate with their respective former Fragment ViewModels. Other than that, they’re also supporting our current screen navigation system, built on Jetpack Navigation, totally dependent on our former Activities and Fragments.
What’s wrong with it?
Well, it just doesn’t feel right. Once most of the layout is now built with Compose, it feels like we’re not taking the most out of it in terms of navigation, side effects, and it’s and how the code should be structured, ending up losing some of the reactive features that Compose has to offer. Thus, we still have a lot of boilerplate code on those Fragments And Activities mentioned above.
So we started our analysis with the two most common tools that Android developers are using for navigation, Jetpack Navigation (the one we have been using) and Compose NavHost.
Jetpack Navigation
Jetpack Navigation is a component made to help developers implement navigation between different screens and more complex patterns, such as Drawer or App Bars navigation. This component is also a part of the Android Jetpack, a set of components designed to accelerate Android application development.
We have been developing our apps with this component so it’s fair to admit that we have several experiences with it. In the team, we all agree that it has been a reliable tool, not only because it offers a good visual representation of the user’s navigation paths but it is also very effective in encapsulating the implementation of the navigation details.
The Navigation Graph can be built with a visual drag-and-drop tool or an XML file with a set of marked-down rules that let you guide the user between activities, fragments, modal and popup dialogues with all sorts of different animations under the hood. It also includes support for backstack management and deep linking.
This component is UI toolkit agnostic, so we have been able to use it with our XML and Compose code, which turns out to be perfect for projects under the scenario of Compose migration.
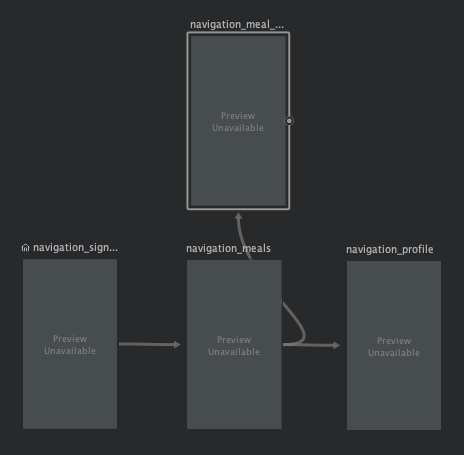
So let’s try it! Let’s say we were building our Carbs & Cals app again from scratch with these three main flows using the Single Activity approach:
- The Onboarding/Sign In flow
- The Log a Meal flow (with a second screen for the meal details)
- Profile / Settings flow
Taking the MealsScreen as the principal screen of the app, this was the solution provided through the drag & drop navGraph tool that Android studio provides, generating the following graphic and XML code:
<?xml version="1.0" encoding="utf-8"?>

<navigation xmlns:android="http://schemas.android.com/apk/res/android"

    xmlns:app="http://schemas.android.com/apk/res-auto"

    xmlns:tools="http://schemas.android.com/tools"

    android:id="@+id/mobile_navigation"

    app:startDestination="@+id/navigation_sign_in">


    <fragment

        android:id="@+id/navigation_sign_in"

        android:name="com.example.jetpack_navigation_test.ui.signIn.SignInFragment"

        android:label="@string/title_sign_in"

        tools:layout="@layout/signInFragment" >

        <action

            android:id="@+id/action_navigation_sign_in_to_navigation_meals"

            app:destination="@id/navigation_meals" />

    </fragment>


    <fragment

        android:id="@+id/navigation_meals"

        android:name="com.example.jetpack_navigation_test.ui.meals.MealsFragment"

        android:label="@string/title_meals"

        tools:layout="@layout/mealsFragment" >

        <action

            android:id="@+id/action_navigation_meals_to_navigation_profile"

            app:destination="@id/navigation_profile" />

        <action

            android:id="@+id/action_navigation_meals_to_navigation_meal_details"

            app:destination="@id/navigation_meal_details" />

    </fragment>


    <fragment

        android:id="@+id/navigation_profile"

        android:name="com.example.jetpack_navigation_test.ui.profile.ProfileFragment"

        android:label="@string/title_profile"

        tools:layout="@layout/profileFragment" />


    <fragment

        android:id="@+id/navigation_meal_details"

        android:name="com.example.jetpack_navigation_test.ui.meals.MealDetailsFragment"

        android:label="@string/title_meal_details"

        tools:layout="@layout/mealDetailsFragment" >

        <argument

            android:name="mealId"

            app:argType="string" />

    </fragment>

</navigation>
Given we have added a meal id as an argument to that specific screen transition, the library generated the following
actionMealsFragmentToMealDetailsFragment(String : meal.id)
method automatically, and it can be called from any click listener inside the MealsFragment:
findNavController().safeNavigate(MealsFragmentDirections.actionMealsFragmentToMealDetailsFragment(meal.id))
Finally, to set the NavGraph as the main container of the MainActivity:
class MainActivity : AppCompatActivity() {


 private lateinit var binding: ActivityMainBinding


 override fun onCreate(savedInstanceState: Bundle?) { super.onCreate(savedInstanceState)


 binding = ActivityMainBinding.inflate(layoutInflater) setContentView(binding.root)


 val navView: BottomNavigationView = binding.navView


 val navController = findNavController(R.id.nav_host_fragment_activity_main)

 // Passing each menu ID as a set of Ids because each

 // menu should be considered as top level destinations.

 val appBarConfiguration = AppBarConfiguration(

  setOf( R.id.navigation_home, R.id.navigation_dashboard, R.id.navigation_notifications

     )

      )

 setupActionBarWithNavController(navController, appBarConfiguration)

 navView.setupWithNavController(navController)

 }

}
Navigating with Compose - NavHost
In the context of Compose Development, NavHost is a composable function that hosts a navigation graph in your Compose hierarchy. It's responsible for swapping composables (UI pieces) in and out as the user navigates through the app.
The navigation paths are also defined in a navigation graph form, which makes it simple to visualize user navigation paths for debugging and maintenance. However, here, the graph is built under a URL form, similar to the web navigation approach.
Its primary benefit is providing a consistent, predictable navigation structure within the Jetpack Compose framework by integrating the powerful and flexible state management system that Compose has to offer.
The combination of state variables, state hoisting, and ViewModel integration makes it well-suited for building dynamic and reactive user interfaces in a Compose NavHost environment.
Taking the same example as the above, here’s the implementation using UI composables and the NavHost composable:
We start by defining our Navigation composable with four possible screen destinations. Despite the Screen class being optional, it helps keep the code clean.
sealed class Screen (val route: String) {

    object SignInScreen : Screen("sign_in_screen")

    object MealScreen : Screen("log_meal_screen")

    object MealDetailsScreen : Screen("meal_details_screen")

    object ProfileScreen : Screen("profile_screen")


    //Utils function to pass string arguments when navigating

    fun withArgs(vararg args: String): String {

        return buildString {

            append(route)

            args.forEach { arg ->

                append("/$arg")

            }

        }

    }

}


@Composable

fun Navigation(navController: NavHostController) {

    val signInScreenViewModel = SignInScreenViewModel()

    val mealScreenViewModel = MealSreenViewModel()


    NavHost(navController = navController, startDestination = Screen.SignInScreen.route) {

        composable(route = Screen.SignInScreen.route) {

            SignInScreen(navController = navController, signInScreenViewModel)

        }

        composable(route = Screen.LogMealScreen.route) {

            MealScreen(navController = navController, mealScreenViewModel)

        }

        composable(route = Screen.ProfileScreen.route) {

            ProfileScreen(navController = navController)

        }

        composable(

            route = Screen.MealDetailsScreen.route + "/{meal}",

            arguments = listOf(

                navArgument("meal") {

                    type = AssetParamType()

                    nullable = false

                }

            )

        ) { entry ->

            MealDetailsScreen(

                navController,

                post = entry.arguments?.getParcelable("meal")

            )

        }

    }

}
Setting the Navigation composable as the main container of the MainActivity
class MainActivity : ComponentActivity() {

    override fun onCreate(savedInstanceState: Bundle?) {

        super.onCreate(savedInstanceState)

        setContent {

            val navController = rememberNavController()


            MyApplicationTheme {

                Scaffold() {

                    Box(modifier = Modifier.padding(it)) {

                        Navigation(navController)

                    }

                }

            }

        }

    }

}
Below it’s an example of how a navigation intent can be called using our helper class to pass the meal id as a parameter and pick the correct route to the MealDetailsScreen
@Composable

fun MealScreen(navController: NavController, mealScreenViewModel: MealSreenViewModel) {

    Scaffold {

        LazyVerticalGrid(

            modifier = Modifier.padding(it).fillMaxSize(),

            columns = GridCells.Adaptive(minSize = 128.dp)

        ) {

            items(mealScreenViewModel.items.size) { item ->

                Card(

                    modifier = Modifier.clickable {

                        navController.navigate(Screen.MealDetailsScreen.withArgs(item.mealId))

                    }

                        .padding(16.dp)

                        .fillMaxWidth()

                ) {

                                    //Card Content

                }

            }

        }

    }

}
Comparison
While both NavHost and Jetpack Navigation aim to simplify navigation in Android apps, they do so in slightly different ways. NavHost focuses on providing a container that hosts different destinations (Composables) defined in a navigation graph using the URL approach, while Jetpack Navigation provides a complete solution that encompasses fragment transactions, backstack management, popups modals and deep linking through a visual graph.
On both Navigations components, the approach is primarily using the graphs for navigating between different fragments or composables within a single activity, rather than for navigating between multiple activities. However, for the XML version we have to predict every possible transition, whilst on Navhost the URL scheme make a certain screen accessible from any point of the graph.
To navigate through multiple activities, you can add them to your graph if using Jetpack Navigation while you might have to a NavGraph per Activity if you’re going for the compose navigation, using Intents to navigate between activities when it’s necessary.
Regarding screen transition animations, Jetpack Navigation provides a more declarative approach to animations through the XML navigation graph, making it easier to visualize and manage animations in a centralised manner, while compose’s animation system is more custom, granular and programmatic which might be more demanding when building your app.